Although many people believe that doing tessellations is not math, it most certainly is and it is a very important skill to teach all ages k-12. Since tessellations do not depend on numerical skills, they can be created by students with varying mathematical skill levels. Tessellations introduce problem solving and many different mathematical concepts (http://www2.gvsu.edu/oxfordj/teach.html).
Tessellations can be used as a counting activity for the younger students. The students could count how many different shapes are in the tessellation, they could also count the number of a certain shape are in a row or column, they could count the amount of times the pattern repeats, and they could determine how many tiles are colored the same. Tessellations could also be used in geometry lessons to make new shapes. The students could combine tiles to make new geometric figures, draw out the new figure they discovered and figure out what it is called and its properties. Finally, tessellations are also an awesome way to teach the concepts of rotation and reflection. The students could determine the original shape or object, and figure out if it was rotated or reflected to make the next shape in the tessellation (http://www2.gvsu.edu/oxfordj/teach.html).
Tessellations were first used by the Sumerians in about 4000BC for wall decorations formed by clay tiles. One of the first studies of tessellations was done by Johannes Kepler in 1619. He wrote a book called "Harmonices Mundi" about harmony and congruence in geometric and physical forms. Within the book he wrote about regular and semi-regular tessellations by exploring the structures of honeycomb and snowflakes. Finally, in 1891 Yevgraf Fyodorov, a Russian crystallographer, discovered that all the periodic tilings in a plane contain one of the seventeen groups of isometries. This became one of the reasons mathematicians started to study tessellations (https://en.wikipedia.org/wiki/Tessellation#History).
In class, we looked at many different types of tessellations, some easier and some more complex. I did one that contained three shapes and three colors, that was not hard to figure out and replicate. However I also completed another one that took a little more thinking to figure out how to make the pieces fit together to make a tessellation.
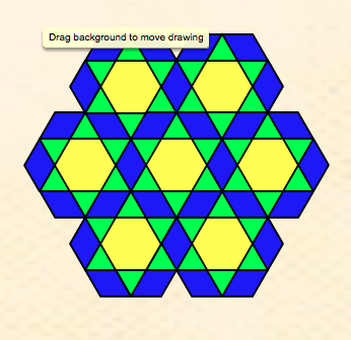
The first one I created is featured to the right. I started out with the hexagon and realized I could put a triangle on each edge. From here I noticed that a rhombus fit in-between two of the triangles. I then noticed that this figure just formed another hexagon, so from there I tried to create another larger hexagon with the same pattern as before. I also noticed that if I kept repeating the pattern, I would eventually keep creating larger and larger hexagons. Also, if I were to only have one of the smaller hexagons, and cut it in half, it is symmetrical, and the entire large hexagon is symmetrical as well. This tessellations could especially be used in a younger elementary classroom to explain how certain shapes can make other shapes.
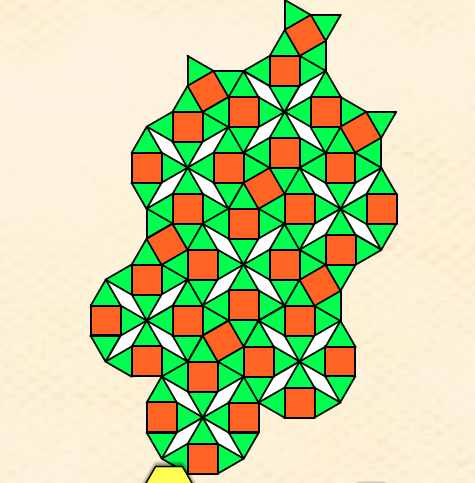
The second tessellation, to the left, I created was harder to figure out the pattern and where I had to stop the tiling, in order to be able to repeat the pattern. I started with four green triangles in the middle, all meeting at their points. I then realized I could put an orange square on the "bottom" of the triangle. I also noticed that the white diamond fit perfectly in-between the four triangles, and from there two more triangles could be put in-between the white diamond and the squares. I noticed this was a 12 sided polygon (also known as a dodecagon). However repeating the dodecagon was not going to fill all the gaps. Therefore, on the top right corner of each dodecagon, I placed a square that touched corners with the top square, and filled in the edges of the square with green triangles. From here, the pattern could be repeated to create a tessellation. This tessellation could be used in a classroom to help teach the ratio, for example what the ratio is of each color the the others (white to orange to green).
All in all, not only are tessellations fun, but they are also very informative and a great lesson to teach all ages. It is a way to get the students thinking and problem solving, in a way where they do not think they are actually "doing" math. I will for sure incorporate different tessellation lessons throughout my teaching career!
Tessellations can be used as a counting activity for the younger students. The students could count how many different shapes are in the tessellation, they could also count the number of a certain shape are in a row or column, they could count the amount of times the pattern repeats, and they could determine how many tiles are colored the same. Tessellations could also be used in geometry lessons to make new shapes. The students could combine tiles to make new geometric figures, draw out the new figure they discovered and figure out what it is called and its properties. Finally, tessellations are also an awesome way to teach the concepts of rotation and reflection. The students could determine the original shape or object, and figure out if it was rotated or reflected to make the next shape in the tessellation (http://www2.gvsu.edu/oxfordj/teach.html).
Tessellations were first used by the Sumerians in about 4000BC for wall decorations formed by clay tiles. One of the first studies of tessellations was done by Johannes Kepler in 1619. He wrote a book called "Harmonices Mundi" about harmony and congruence in geometric and physical forms. Within the book he wrote about regular and semi-regular tessellations by exploring the structures of honeycomb and snowflakes. Finally, in 1891 Yevgraf Fyodorov, a Russian crystallographer, discovered that all the periodic tilings in a plane contain one of the seventeen groups of isometries. This became one of the reasons mathematicians started to study tessellations (https://en.wikipedia.org/wiki/Tessellation#History).
In class, we looked at many different types of tessellations, some easier and some more complex. I did one that contained three shapes and three colors, that was not hard to figure out and replicate. However I also completed another one that took a little more thinking to figure out how to make the pieces fit together to make a tessellation.
The first one I created is featured to the right. I started out with the hexagon and realized I could put a triangle on each edge. From here I noticed that a rhombus fit in-between two of the triangles. I then noticed that this figure just formed another hexagon, so from there I tried to create another larger hexagon with the same pattern as before. I also noticed that if I kept repeating the pattern, I would eventually keep creating larger and larger hexagons. Also, if I were to only have one of the smaller hexagons, and cut it in half, it is symmetrical, and the entire large hexagon is symmetrical as well. This tessellations could especially be used in a younger elementary classroom to explain how certain shapes can make other shapes.
The second tessellation, to the left, I created was harder to figure out the pattern and where I had to stop the tiling, in order to be able to repeat the pattern. I started with four green triangles in the middle, all meeting at their points. I then realized I could put an orange square on the "bottom" of the triangle. I also noticed that the white diamond fit perfectly in-between the four triangles, and from there two more triangles could be put in-between the white diamond and the squares. I noticed this was a 12 sided polygon (also known as a dodecagon). However repeating the dodecagon was not going to fill all the gaps. Therefore, on the top right corner of each dodecagon, I placed a square that touched corners with the top square, and filled in the edges of the square with green triangles. From here, the pattern could be repeated to create a tessellation. This tessellation could be used in a classroom to help teach the ratio, for example what the ratio is of each color the the others (white to orange to green).
All in all, not only are tessellations fun, but they are also very informative and a great lesson to teach all ages. It is a way to get the students thinking and problem solving, in a way where they do not think they are actually "doing" math. I will for sure incorporate different tessellation lessons throughout my teaching career!
 |  |
 RSS Feed
